
I just got a 27″ iMac (version 14,2) and had a hard time finding status reports online on how well it works with Ubuntu along side with OS X. Also it seems the guides online are not that updated and there are various ways to install Ubuntu – but which way works and gives the best result?. Below is my experience and how I got it to work.
tl;dr
Besides a small issue with headphones audio, and installing an extra program for handling bluetooth HID-devices, Ubuntu 14.04 works very well with iMac14,2. Everything works out of the box (including the webcam, WiFi and HDMI via mini DisplayPort). In other words the result is close to perfect!

Some notes about rEFInd and boot camp
Some sites say that rEFInd is needed in order to boot Ubuntu on a Mac. As far as I can see those times are over.
Using Apples Boot Camp creates some legacy BIOS emulation for Windows and should have some pitfalls when using Ubuntu.
Bottom line I used neither rEFInd nor Boot Camp, and it works allright without.
Installing Ubuntu on iMac along side with OS X
Based on this guide.
The following was how I in may 2014 installed Ubuntu 14.04 LTS on an iMac 27″ (iMac14,2). During the installation you would need a keyboard and a mouse connected via USB.
You can see what version of iMac you are using with the following command (iMac14,2 for me):
OS X: sysctl hw.model
Ubuntu: sudo dmidecode -s system-product-name
Preparing a USB boot medium
In OS X: Download Ubuntu 14.04 LTS from a mirror close to you:
wget http://mirrors.dotsrc.org/ubuntu-cd/14.04/ubuntu-14.04-desktop-amd64.iso
Convert the iso. Otherwise the Mac apparently can not boot from the USB drive
hdiutil convert ubuntu-14.04-desktop-amd64.iso -format UDRW -o ubuntu-14.04-desktop-amd64.img
Insert your USB flash drive and determine what the device name is
diskutil list
Unmount the USB flash drive and write the .img file to the flash drive (replace N with the disk number from the command above. For me it was 1).
diskutil unmountDisk /dev/diskN

sudo dd if=ubuntu-14.04-desktop-amd64.img.dmg of=/dev/diskN bs=1m
- Boot live Ubuntu and do basic testing
Before you install Ubuntu on your Mac, I recommend that you boot into a live Ubuntu and look around how well it works on the hardware you have (Select “Try Ubuntu without installing”).
 Shutdown OS X and turn on your computer again. During startup hold down the option key (normally marked alt and located between the ctrl and cmd keys left to the space key.
Ubuntu should now boot and you can do your testing. Reboot when done and boot back into OS X.
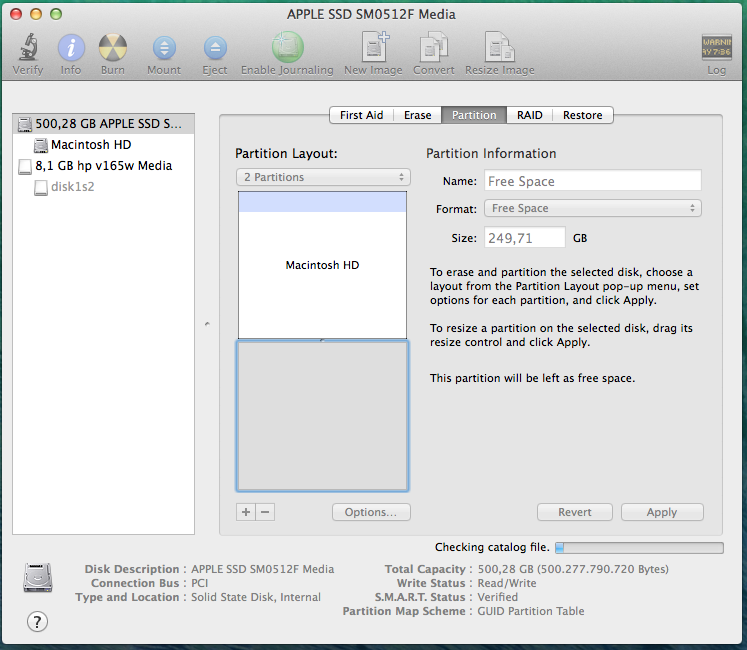
- Repartition your disk
In OS X start Disk Utility. Choose your disk and create and adequate portion of free space by clicking the +, thus shrinking the existing partition. Apparently doing this with gparted from Ubuntu may result in OS X not being able to boot.
- Boot live Ubuntu and install Ubuntu
It is important that you do not reboot your computer after having installed Ubuntu, since we need to modify EFI so that we can actually boot Ubuntu.
Shutdown OS X and boot, again holding down the option key and booting Ubuntu (Select Try Ubuntu without installing).
When Ubuntu has booted install Ubuntu. When asked about Installation type simply check Install Ubuntu alongside Mac OS X.
- Post installation on live system
Once you have installed Ubuntu do not reboot just yet. Run the following in a shell:
sudo apt-get install efibootmgr

sudo efibootmgr
My output was:
BootCurrent: 0000

Timeout: 5 seconds

BootOrder: 0080

Boot0000* ubuntu

Boot0080* Mac OS X

Boot0082*

BootFFFF*
In order to get the computer to boot from Ubuntu the BootOrder parameter has to include Ubuntu (with the address 0x0080). This is done by executing the following:
sudo efibootmgr -o 0,80
Now you may reboot your computer and startup Ubuntu.
- Getting the Apple Magic Mouse and Wireless Keyboard to work
Remember to turn on the mouse and keybard. For the mouse it helps to click it in order to activate it.
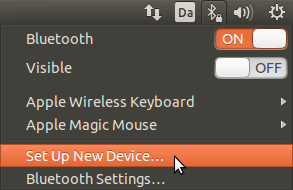
In the top right corner select the bluetooth icon and choose “Set Up New Device”.
 For the keyboard I just selected it, clicked continue and entered the PIN it showed on the keyboard followed by the enter key and it worked. For the the Magic Mouse choosing the PIN 0000 seemed not to work, though as far as I could read on various sites it shoud, so I installed blueman.
sudo apt-get install blueman

sudo blueman-assistant
The latter opens a wizard where it is possible to choose the mouse and use it as an “input service”.

- Getting headphones to work (built in speakers works out of the box)
The build in speakers work fine but I could not get the headphones plug to work out of the box. I found many (not all too recent) guides suggesting everything from messing around with alsa-mixer to inserting stuff like options snd-hda-intel model=imac27_122 into /etc/modprobe.d/alsa-base.conf followed by alsa force-reload. None of it worked for me.
The thing that worked for me was using a small program called hda-analyzer from the ALSA project:
wget 'https://git.alsa-project.org/?p=alsa.git;a=blob_plain;f=hda-analyzer/run.py' -O run.py

sudo python run.py
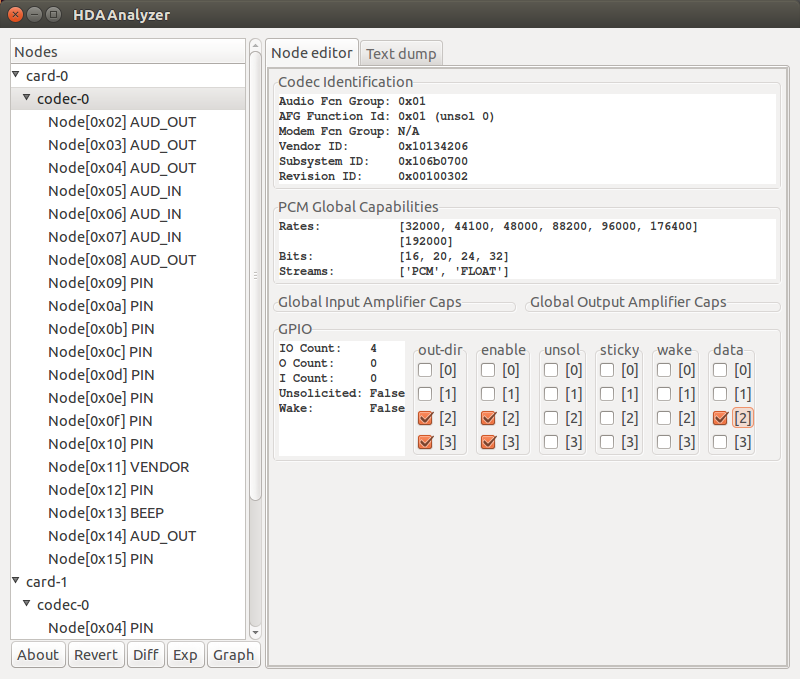
The script downloads some more python files from the ALSA project and you get the following window:
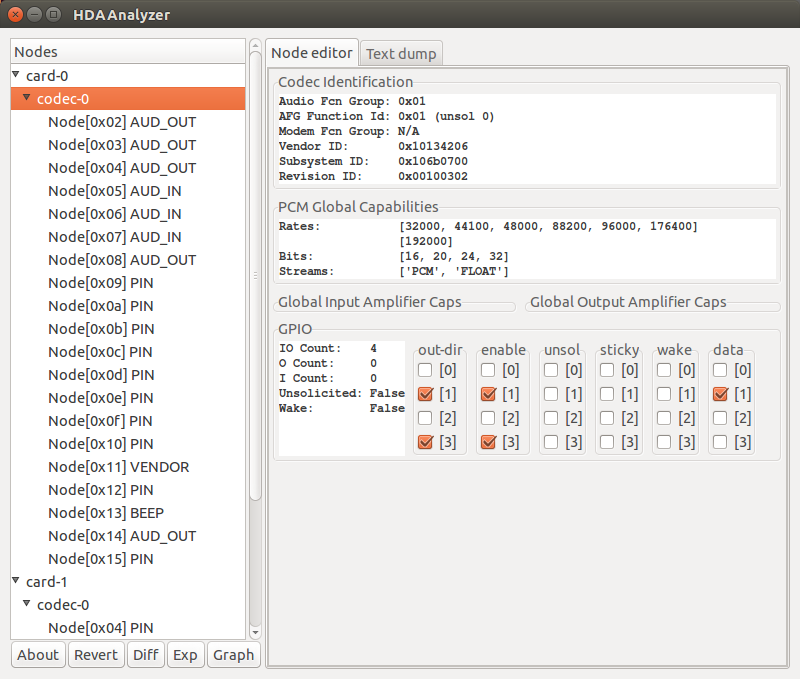
Choose Codec-0 and de-select the row [1] and select the row [2] as showed below (check the data column as the last column, or you will be unable to select it, it seems):
hda-analyzer changes what output that is used (if you want to go back to the build in speakers you need to click around in hda-analyzer again – it does not happen automatically :-/ ).
The setting for the audio play through the headphones plug is not persistan accross reboots. Since I only use headphones I want this to happen automatically when I log in. This is possible by choosing the Exp button at the bottom to the left. hda-analyzer then generates a little python script that can be used to set the current settings.

Save the file and move it to e.g. /usr/local/bin/fix-imac-external-audio.py
In .bashrc add
/usr/bin/sudo /usr/local/bin/fix-imac-external-audio.py
with sudo visudo add (substitute username with your actual username):
username ALL = NOPASSWD: /usr/local/bin/fix-imac-external-audio.py
Now this is not an ideal solution – but it solved the problem for me (and should I have removed the headphones jacks and put them back in I just start a new shell). There is probably a much better location for the script, in order to only run the script once when Unity is started.
- For non-US keyboard, getting <> key to work
From this guide.
I got a danish keyboard with a button containing the characters< and > between shift and the letter Z. However that is not what I get when pressing it (I get ½). Executing the following fixes that:
echo 0 | sudo tee /sys/module/hid_apple/parameters/iso_layout
This is not persistant accross reboots, so we need to run the following:
echo options hid_apple iso_layout=0 | sudo tee -a /etc/modprobe.d/hid_apple.conf

sudo update-initramfs -u -k all
- Graphics driver
The default driver is not well suited for e.g. watching videos. In the Additional Drivers program choose the NVIDIA binary driver.
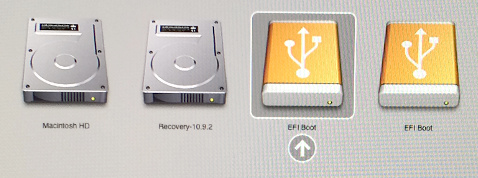
- Booting into OS X
Hold down the option key at boot and choose Macintosh HD
- Feedback
Feel free to give me feedback, e.g. by email. Especially I would like to hear about a better solution for the headphones fix.
I would love to see a good guide on Ubuntu’s community pages. Since I am new with Ubuntu on Mac I will let somebody more experienced on that topic write such a page 🙂